Showing posts with label dessert. Show all posts

Thursday, June 5, 2014

Gluten-free Shortbread Cookies

New experiment! I found a recipe here that looked worth trying, but couldn't resist tweaking it by adding in some almond butter. Since I was a little skeptical, I planned to make a 1/3 batch. In fact, I added the butter as if it were a 1/3 batch. And just realized that I only halved the rest of it... I should know better than to not write it all down! So now I understand why I had to add more moisture.

I also was skeptical of the cook temp/time. She says 300º for 20-30 minutes, but that surprised me. Since we had lasagna in the oven at the same time, I did half of them at the typical 350º for 20 minutes, and the other half at 300º for 25 minutes.

And good news! They turned out! The temperature really didn't seem to matter and there wasn't even a coffee flavor from my chosen milk substitute. In my opinion, they were VERY dry. Too dry. I guess because of all of the corn starch, so if I experiment again I will be sure not to use such a starchy recipe. They might be good with tea or coffee, I'll try that tomorrow.


Here's what I did in full batch amounts, in case you are feeling adventurous, too:

Gluten-Free Shortbread Cookies
Makes 32 cookies. 10 minutes to blend, 60 to chill, 20 to cook

1/2 cup cornstarch
1 cup brown rice flour (you can make your own!)
1/2 cup powdered sugar
6 Tbs butter, room temperature
2 Tbs almond butter
3 Tbs milk/replacement (approximate! I used a protein-enriched coffee dairy drink)

1. Sift together the cornstarch, rice flour and powdered sugar.
2. Cut in the butter and almond butter with a pastry blender (or knife and fork, that's what I had) at first, then mix with a big fork or a spoon.
3. Add in liquid about  teaspoon at a time and stir well between additions. You want JUST enough liquid to make it stick together.
4. Make a 'log' of cookie dough down the center of a piece of plastic wrap and roll up. Chill for AT LEAST an hour. These don't get as firm as typical shortbread cookies because of the lower butter content. They are a bit lower in fat, though!
5. Bake at 350 for 20 minutes. Parchment paper makes them easier to remove from the pan.
6. Let cool at least 10 minutes and enjoy!

Nutrition info per 3 cookies: 116 Calories, 5.8g Fat, 15.4g Carbs, 1.3g protein

Saturday, May 24, 2014

Baba a l'orange - Or an easy, fancy-seeming French dessert

Last week I was watching a French competition show, "Who will be the next great pastry chef." I *love* it, it's a Top Chef kind of set up, with 15 or so people competing to be a master chef. I forget what the prize is, they don't repeat it ten trillion times. I happen to like the French version better because each episode is 2.5 hours, giving them time to really describe what's going on. They are also much less bitchy and dramatic, which is a nice change. With YouTube's 'watch later' function, I can easily pause when I have to do Real Things and then come back when I have time again.

The classic of this is Baba au rhum, which is a cake that is allowed to sponge up a rum and simple syrup mixture. And I didn't have any rum. I like it well enough, but apparently I am more likely to buy tequila and vodka. Luckily, I also had orange liqueur, purchased to go with that tequila in a delicious margarita. Ah, summer!

This is a good dessert to make because it's simple, yet impressive-sounding. Plus the alcohol is added to a syrup that the cake is soaked in once everything is a bit cool, leaving it very noticeable! You could also use maple syrup if you prefer, I just wouldn't use so much. Oooooh, or coffee! Or coffee with kahlua and Bailey's.... I may need to make this again next week.

It was very simple to make, but at stages it was very surprising, too. The 'dough' at one point looked like Gak - that stretchy putty/clay stuff they sold on Nickelodeon when I was a kid. But it turned out delicious, so do not worry! Check out the original in the book for how to make it in a stand mixer, I used a hand mixer and detail that below.


Baba à l'orange (based on Dorie Greenspan's "Paris Sweets" recipe)
Makes 12 mini cakes     Bake time: 30 minutes      Prep time: 30 minutes    Wait time:  30 minutes
Total time: 90 minutes or less

Dough:
1/3 cup water, room temperature
1 packet (2 1/4 teaspoons) yeast
3 tablespoons white sugar
1 cup all-purpose flour
1/4 teaspoon salt
4 large eggs, room temperature
6 tablespoons unsalted butter

- Butter a 12-muffin muffin tin and set it aside. Melt butter and allow to cool while you do the next few steps.
- Stir water, yeast and sugar together in a deep bowl, that is unlikely to let things be 'thrown' by your mixer. (I ended up with dough all over!) Once the yeast is dissolved, add the flour and salt. Use the dough attachments to beat on medium low for two minutes, until the ingredients look like they are holding together more than falling apart. Mine varied in size from peas to tablespoons.
- Switch to the regular beater attachments. Add two eggs and beat on low for 3 minutes. Add the other two eggs and beat on low until they are incorporated, and turn up to medium for as long as you can. The dough was really climbing my beaters at this point, so even with pushing it down it only lasted about 1 1/2 minutes.
- Add the cooled butter and beat for as long as you can stand, up to five minutes. I probably lasted 1 minute here because the dough climbed the beaters almost into the motor!

This is when the dough was gak-like. The picture below is not an action shot, it really held together like that! It was hard to even separate some to put into the tin.

- Divide the gak 'batter' among the muffin tins, which will be 1/3-1/2 full. Cover and let rise in a warm place for 25-30 minutes.
- When almost risen, place a rack in the center of the oven and preheat to 350ºF.
- Uncover the tin, and place in the oven. Prop the oven door open with a then wooden spatula or other heat-proof utensil. Bake for 23-28 minutes, or until golden brown. (Make the booze syrup while they bake!)
- When done, place tin on cooling rack. Let cool in tin for 5 minutes, then turn out to cool completely.

Syrup:
1 1/4 cup water
3/4 cup white sugar
1/4 cup orange liqueur (Make sure you like the way it tastes! I used good stuff) (Of course, you could replace this with a lower amount of any flavoring you like.)

- Bring the water and sugar to a low boil in a saucepan. Pour the syrup into a deep bowl and allow to cool until just before you want to soak the cakes. The deep bowl is important to make soaking the cakes easier.
- Right before soaking, add the liqueur to the syrup and stir well.

To soak:
- Poke each cake 5-10 times with a toothpick, to help it absorb the syrup.
- Put each cake into the syrup and flip a few times, letting soak for about a minute each.
- Repeat with all of the cakes. If there is any syrup left, spoon it over the top of them!

Extra syrup spooned over the top, in a pan to help it all stay in
That's it! You can fill them with whipped cream if you like, but we enjoyed them as-is. Mr. More Calories was surprised at how different they are from things he's had before. I admit that they were time consuming, but very easy!

Thursday, March 20, 2014

Chocolate Beet Brownies with extra protein!

Since I mostly put these up for me (notice there aren't any ads?) and I'm spending way too much time in front of a computer lately, I figured that I will put things up without pretty writing around it.

Goal: Treats that are food, not sugar and empty calories. More 'real' food and protein here.
Ingredients to use: Beets and chocolate

Inspiration recipes:
http://recipes.sparkpeople.com/recipe-detail.asp?recipe=1698774
http://thesmartcookieblog.com/chocolate-frosted-sweet-potato-beet-cake/


Chocolate Beet Brownies (cakey!)
Serves: 12-16

130g beets (3 small beets, about 1.5 cups of my shred)
1/2c unsweetened applesauce
2 eggs
2T olive oil
1/4 c maple syrup
2 scoops (54 g) vanilla whey protein
1/2c cocoa
1/2t baking soda
1 t baking powder
1/4c white whole wheat flour
1/4 c mini chocolate chips

1. Grate the beets. Mine were finely grated. Preheat oven to 350 and grease a baking pan (8x8, 9x9 or 11x7 should all work)
2. Mix wet ingredients in a large bowl.
3. Mix dry ingredients in a medium bowl.
4. Add dry to wet, mix to combine.
5. Bake at 350 for 25 min (or til toothpick is clean!)

Nutrition facts for bar 1/12th of recipe: Cal - 97     Fat - 4.2g      Carbs - 11.7g     Protein - 5.5g

Sunday, September 8, 2013

Ovenless Carrot Cake!

I am having an amazing afternoon snack of freshly baked Carrot Cake. I am thrilled by it.

When I was little, my mom almost always had an after school snack for us. Cookies or cake or popcorn or who knows what. To be honest, I mostly remember cookies. There may have been other things. It was so consistant that we would sometimes have other people drop in. They were boys, just older than my sister, and I kind of wonder if she was the one to make it sometimes to get them to come over...

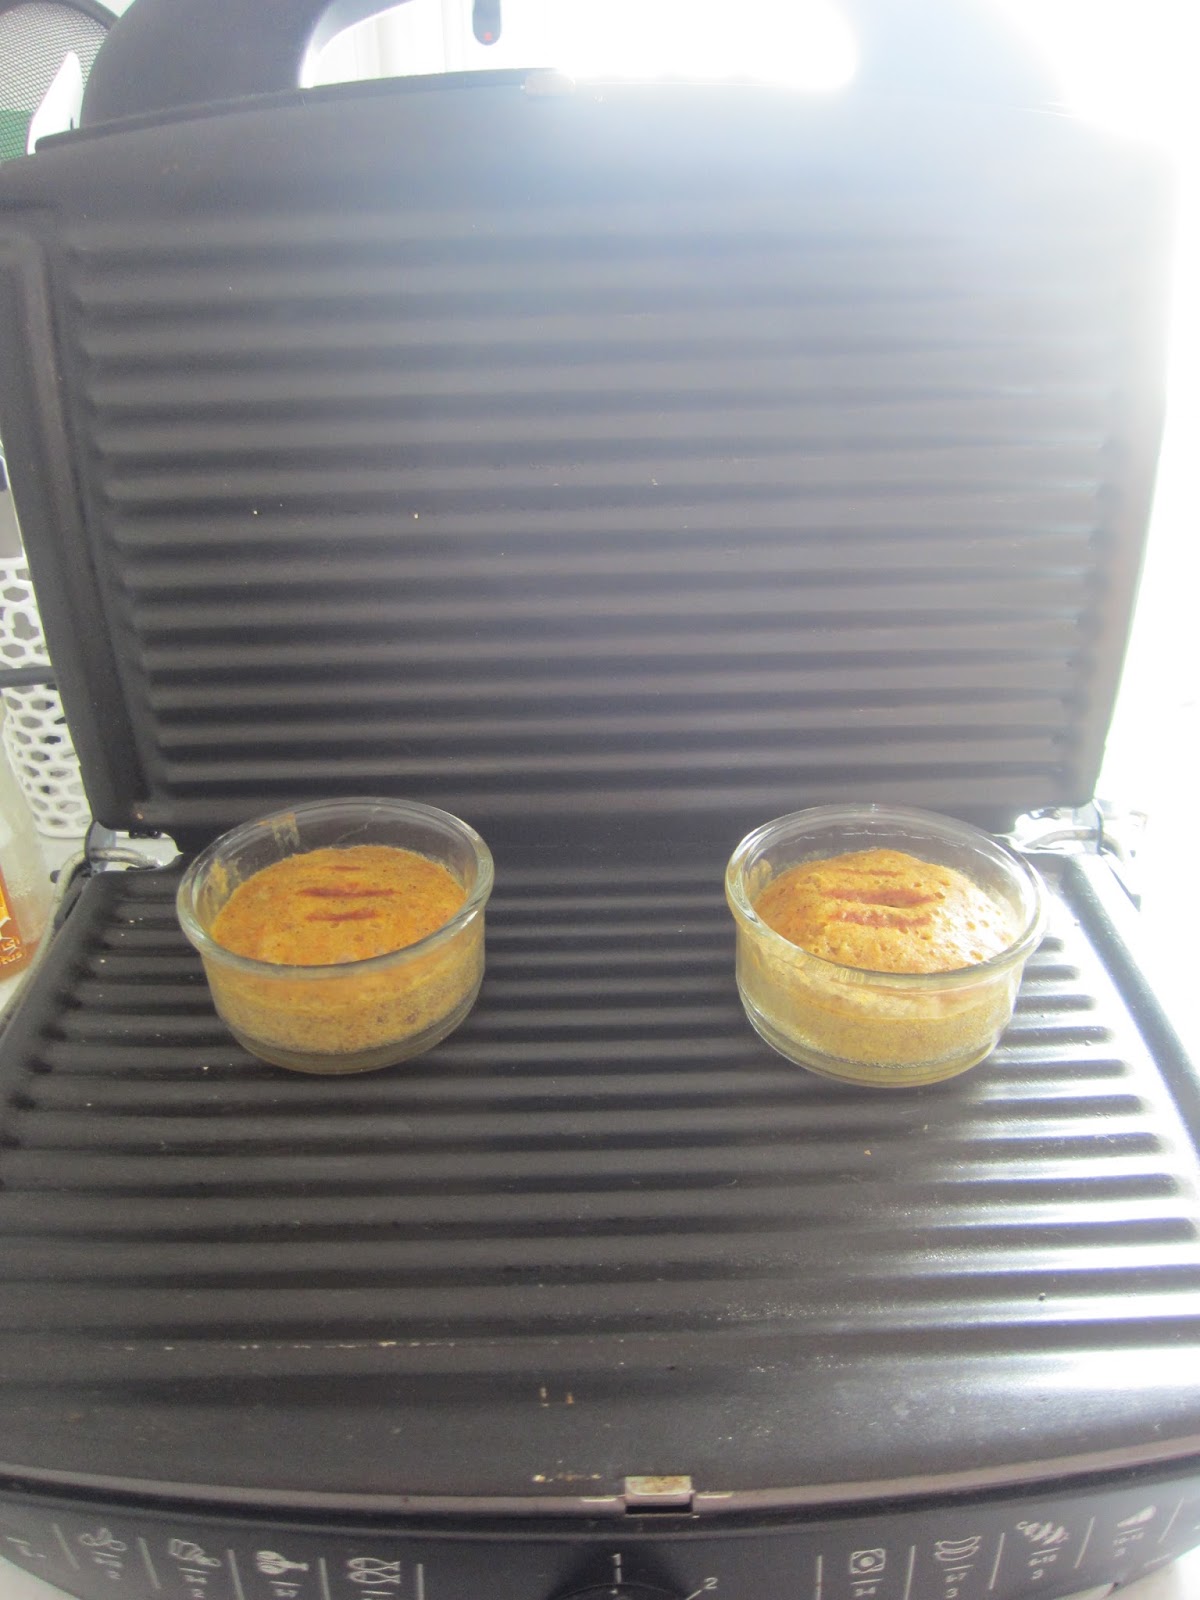
In Morocco lunch is the main meal of the day, often around 1 or 2pm, and dinner might not be until 9 or 10. So there is a 'casse-croute' around 5 or 6pm a lot of times, because who can last 8 hours between meals?? Coffee or tea and bready treats with jam or butter or olive oil or honey. I need to learn how to make a bunch of those things, but that will take time. I have also been bemoaning the typical lack of oven, as you saw with the biscuits, and found a crazy idea to bake on a panini press. For whatever reason panini press-like electric grills are common, and one came in my furnished apartment, so I headed out today to buy ramekins!

I started with the brilliance of CCK's single serving cakes, since I know they work well, and had to adjust for availability of ingredients and 'baking' method. Luckily I found a bunch of spices at a store nearby, including whole nutmeg! Awesome.  For all of you with access to a microwave, feel free to use the original recipe here. You can also find suggestions to decrease the calories and fat. For anyone else without an oven, or with a taste for odd methods, continue on.


Carrot Cake, 'baked' in ramekins on a panini-press 
Serves 2 (or 1 me)

1/3 cup flour (I happen to have cake flour, but at this amount I doubt it matters)
1/2 tsp cinnamon
1/8 tsp ginger
1/8 tsp fresh nutmeg
1/2 tsp baking powder
2 Tbs white sugar
1 tsp vanilla sugar (or use 1/4 tsp vanilla extract)
1 egg (original uses just half an egg's worth of replacer, so mine is certainly heavier, but I had no good way to keep half an egg!)
1/2 cup finely grated carrots, 
2 Tbs milk
2 tsp oil (or more milk if you'd rather)

- In a small bowl, mix dry ingredients (not carrots).
- Mix carrots and wet ingredients in a separate bowl. 
- Mix wet and dry ingredients and mix well.
- Pour into four greased ramekins (mine are 1/2 cup)

- If on press, 'bake' at just under 2 (or medium-low) for 10-15 minutes. Let the top of the press sit on the tops of the ramekins, which is why mine have the lovely grill marks on top. If using microwave, Katie says 1 minute, 20 seconds, or 350º for 15 minutes.


- Let cool a bit before wolfing down.


First attempt - heavier than the final recipe

Nutrition info: Cal: 227    Fat: 7.4g    Protein: 5.7g    Carbs: 35g    (Also has 94% of your vitamin A needs!)

Friday, September 6, 2013

Fried Apples

After looking around the interwebs, it looks like the secret to these is typically bacon grease. And of course that is an ingredient that I will have less than no access to for the next four months. Even if it sounds pretty likely. So I went with what I could get - margarine. Not exciting, but you do what you can. I suppose I could call it vegan then, eh?

With four apples I had sitting in the fridge, I used three of them.


(Vegan) Fried Apples
Serves 3-4

3 medium apples (green apples are said to be best)
3 Tbs margarine
3 Tbs sugar (brown if you have it, I had white)
1 tsp cinnamon (you could add nutmeg if you have it)

- Cut apples into thin slices (mine were 20-24 per apple.) and then in half so they're kind of small squares.
- Melt margarine in a skillet over medium-high.
- Add apples to hot skillet and make sure they are not fully stuck together. Unless you have an insanely large pan they'll be on top of each other, but that's fine.
- Sprinkle sugar and cinnamon over apples. And let cook for a several minutes.


- Stir occasionally for 10 or so minutes, until the juices are all bubbly and the apples smell amazing.
- Enjoy while still hot, preferably with some buttermilk biscuits!

Wednesday, June 12, 2013

Ile Flottante - So delicious and potentially so light

One of the first "fancy" desserts that I was introduced to in France was the Ile Flottante or Floating Island. I had had many pastries before that, but it was when I went out to a restaurant somewhere and someone else was paying so I got a dessert (I was 18, that's how it was.) They are so fun looking, with the mountain of egg white on top of the sea of creme anglaise. How can you resist??

Ten years later and I still enjoy it. The egg whites let me pretend it has some redeeming nutritional value, and the caramel and cream are delicious and rich. I even got one on Friday when I had a lunch so big, all I wanted was salad and a thin soup for dinner. Would you like to see it? Let's go through the whole thing, shall we?

First, Foie Gras with Ris de Veau en Croute. (Foie Gras [goose liver paté] surrounded by veal sweet breads, all in a pastry crust.) On the side is some fig spread that made it awesome and a sneeze of salad.

Then Cod with a super tasty sauce and what I think is a beet chip. It was tasty. So was the fried onion. Like an onion ring without the breading. Oh, and the fish was quite nice, too.

I thought our wine glass line-up was pretty. Red, water, water, rosé.

And the sides, to be shared for the table. Fried slices of potato and a macaroni gratin (i.e. fancy french fries in a different shape and extra super fancy mac n cheese.)

And finally, our desserts. We shared 2 between four people. The star of the post is in the front.


You could also try Barefoot Contessa's version, I trust her with desserts: http://www.foodnetwork.com/recipes/ina-garten/ile-flottante-recipe/index.html

However, if you want to go the easy route (as I fully intend when I get home) then I would buy some tasty caramel topping and some good vanilla ice cream. I'll probably pick a lite one or a coconut-based one. The you'd make just the island, and melt the ice cream to be your "sea." If you are cautious about the egg whites, just buy the pasteurized stuff.

Time for dinner here, bon appetit!!

Tuesday, June 4, 2013

Tartelette au Crumble: The best of two cuisines

If you couldn't tell, I am now in France, enjoying all the progress that French gastronomy has made in however many thousand years. I am also in a city that claims to be the capital of gastronomy - not too bad! So I will share some things with you, even if I haven't tried them yet. I have discovered a brilliant little pastry shop and bakery just 2 blocks away from my house. French people eat dinner relatively late (7:30 is when my family eats, and they consider that quite early!) so I need a snack somewhere between my lunch at 12:30 and dinner time.

Today when I stopped in, there was a beautiful tartelette (small tart) au crumble. Yes, crumble is a totally English word. American even, I think. This one was made of "fruits rouges" or fruits of the forest. Here that means blueberries, red currant, blackberries, sometimes raspberries and black currant. A nice mix of flavors to make you want to savor every bite. The tart has a typical tart crust, then the fruit, with an American style crumble on top - you know, sugar, butter and flour. I was going to eat just half, so as to not spoil my dinner, but suddenly realized I was 2/3 of the way through it. Haha, just less for tomorrow!

Fruits of the forest Crumble Tart


I took this picture and then went searching for a good looking recipe and stumbled on one right away. And even more amazing? She posted it IN ENGLISH, too!! Check it out at her blog directly, since I haven't tried it myself yet: http://lespetitsplatsderoseinenglish.blogspot.fr/2012/08/red-fruits-crumble-tart.html?showComment=1370276817944#c1475283672595921731

You'll still need to convert measurements unless you are using a scale. Remember that the equivalent for dry ingredients is ingredient-specfic! Put a cup of powdered sugar in one bowl and a cup of butter in the other and you can feel the weight for yourself. I often use this site, but some ingredients need a bit more searching: http://www.traditionaloven.com/conversions_of_measures/flour_volume_weight.html

Sunday, June 2, 2013

Strawberry Mousse Sorbet

I am now in France, enjoying all kinds of delicious foods, and staying with a host family. My host mom has a magic machine that you can't buy in the US (yet) called a Thermomix. It mixes, it heats, it weighs, it times, it chops, it kneads. So you can see why it's magic. Today we made a Strawberry Sorbet that was extra  magical. It was just strawberries, sugar and an egg white but it had an incredible texture. I'm sure it's due in part to the special whisk attachment of the Thermomix, but I bet you could do it with a VitaMix, too. I shall charge my little sister with making it and reporting back.

I did the nutrition info to post it, and I am stunned at how decent it is! It was so rich and creamy!

Strawberry Mousse Sorbet 

Prep time: 10 min     Servings: 3-6

250 grams frozen strawberries (8.8 ounces, just over half a pound)
40 grams granulated white sugar (1.75 ounces, or 1/4 cup minus 1 Tbs)
1 egg white (you can buy pasteurized egg white in most grocery stores if the truly raw ones worry you.)

- Put the sugar in your mega strong blender and blend until fine.

- Add strawberries (however many your machine recommends at a time) and blend until they are all basically chopped. Hers took 5-6 pulses. You'll mix it more, but this gets it started. Use a spatula to push down the parts on the walls of the blender.

- Blend strawberries with sugar for 1 and a half minutes on high.

- Add egg white and blend on medium for 1 minute. You could also pour it into a bowl and use an electric hand mixed to incorporate more air.

A view through the top of the magic machine as it spun:

Nutrition info for 1/4th of recipe: Cal - 26     Fat: 0g     Carbs: 5.8g     Protein: 0.9g

Tuesday, February 19, 2013

Healthier Box brownies

Years ago I posted a version of a brownie mix recipe that is lower in fat and calories. While that is great, it's not enough for me anymore - I don't just want to have a treat that isn't "bad" for me, I want it to be good for me, too! I add 2g protein per brownie, so it's ok, but not perfect. These are not quite as far in that direction as the amazing chocolate muffins that I will tell you about soon, but they are going the right way.

Being a little ridiculous, like I am, I decided to just adjust the recipe for half of the box, so I had a direct comparison! These are definitely less decadent than the full-fat version, but are still very rich. I did use the Ghiradelli Double Chocolate box, so it was a good starting place. One benefit is that by adding things I got more brownie out of the mix.

More Protein, Less-Fat brownies from a box! (with help)
16 servings, 10 min prep, cooking time varies by brand
Regular recipe on right, healthier version on left.

1 box brownie mix, intended for 8x8 (or 9x9) pan
1 egg
soy milk to replace water called for (1/4 cup in mine - really doesn't add much nutrition, though!)
low-fat or non-fat greek yogurt to replace oil (1/3 cup in mine)
1/2 cup oats (I used old-fashioned)
2 T whey protein (10 grams)


Nutrition info for DRY MIX (1/16th of box): Cal: 140     Fat: 3.5g     Carbs: 26g    Protein: 1g
Nutrition info for my additions (1/16th of total): Cal: 32     Fat: 0.8g    Carbs: 4g      Protein: 2.1g
Total nutrition info, made my way (1/16th of total): Cal - 172    Fat - 4.3g   Carbs - 30g   Protein - 3.1g


Sunday, July 15, 2012

Brownie Batter Dip

I have one thing to say: SOOOOOOOO GOOOOOOOOOOOOOOOD!

Sorry, now that that's out of my system. I've been trying to eat more protein, because when I moved out from being made food, I realized that I don't reach for protein sources automatically. Cookies? Yes. Protein? No. So I figured if I could find some SWEET recipes with protein, easy fix! Oatmeal has a decent dose, then add some nuts & you're good. That's still just one option, though.

Enter Chocolate Covered Katie. She has some amazing ideas I've drooled over before. But she had one that sent me to the cabinet to make. ASAP. Brownie Batter Dip. Yes, amazing deliciousness in dip form that is also full of protein. I kid you not. I am putting the way that I made it, because it was different from hers, but please do see the original at the link above! She has lots of different options.

I actually divided my batch so I could try it with two sweeteners - one with honey and the other with brown sugar. Mr. More Calories says the sugar one would be really good for frosting, but likes the honey one better (as do I.) I realize it's not the most absolutely healthy thing in the world, and I'm excited to try it with dates, but it's super amazing how delicious it turns out!


Brownie Batter Dip
Adapted from Chocolate Covered Katie
Prep time about 10 minutes my way, probably 5 hers
6-8 servings (after making it twice, this seems right.)

1 can garbanzo beans (250g), drained and well rinsed
3-4 Tbs cocoa powder, to taste
2 Tbs milk
3 Tbs almond butter
2 1/2 tsp vanilla extract
1/8 tsp salt
1/3 - 1/2 c honey, to taste (I used 1/2, but will do less next time!)
1/4 - 1/2 c oatmeal (I did it by handfuls, sorry)

I am food processor-less, so I mashed it all first with a potato masher and then put it in a blender and pulsed until it was mostly smooth, and then turned it to high. (She uses a food processor.)

Nutrition info (1/8th of recipe, 3T cocoa, 1/2c honey, 1/4c oats): 257 calories, 6.2g fat, 45 carbs, 9g protein
Nutrition info (1/8th of recipe, 3T cocoa, 1/3c honey, 1/2c oats): 245 calories, 6.4g fat, 40 carbs, 9g protein

Monday, May 2, 2011

April Daring Bakers Challenge: Maple Mousse in an edible container

The April 2011 Daring Bakers’ challenge was hosted by Evelyne of the blog Cheap Ethnic Eatz. Evelyne chose to challenge everyone to make a maple mousse in an edible container. Prizes are being awarded to the most creative edible container and filling, so vote on your favorite from April 27th to May 27th at http://thedaringkitchen.com!

(Mine won't be there because I finished it late. And then I posted it to the wrong blog yesterday. Nice job, me!)

I made the vegan tofu mousse. Except that I couldn't find agar agar (the gelatin replacement) so it's just non-dairy, not really vegan. I'm not sure how it's supposed to work, but I found that the tofu flavor really overpowered the maple, unfortunately.


I decided that my edible container would be this really cool baked mochi that I found at Wheatsville. It looked tasty, and it is! I think I like it best plain.

Vegan Maple Mousse (I recommend taking this only as a starting point):

Ingredients:
• 1 package (12 oz.) soft silken tofu
• ¾ cup (14 fluid oz.) pure maple syrup
• 2 tsp agar-agar

Directions:
1. Let tofu come to room temperature. Using a food processor, blender, or hand mixer, blend tofu until just smooth.
2. Sprinkle agar-agar on the maple syrup and let it rest for 10 minutes. Heat maple syrup on the stove to a boil and then let it simmer 5 minutes until the agar-agar has dissolved.
3. In a food processor, blender, or a large bowl, blend the tofu with the maple syrup until creamy.
4. Refrigerate for at least one hour. Remove from the fridge and divide among your edible containers.

Sunday, February 27, 2011

Daring Bakers February: Panna Cotta and Florentine Cookies

The February 2011 Daring Bakers’ challenge was hosted by Mallory from A Sofa in the Kitchen. She chose to challenge everyone to make Panna Cotta from a Giada De Laurentiis recipe and Nestle Florentine Cookies.

Well, it has finally happened. Something I never expected. Something I didn't even think possible. Something I would have never imagined as a possibility.

I found a dessert I don't like.

Not just, "oh, this could use X" or "Next time I'll do Y." No, it was a, "what did I just put into my mouth??" moment. I actually warned my first taster that I thought it went horribly wrong.... and was told it was perfect, exactly what it should taste like. Apparently, Panna Cotta is not my thing. Luckily, plenty of other people around thought it was wonderful and amazing, if rather rich, and it was all eaten. Just thinking about it again kinda makes my stomach turn.

HOWEVER, it is apparently a great recipe... if you go for that kind of thing! I've got an experimental non-dairy chocolate version in the fridge... it tastes delicious, so we'll see if it solidifies nicely! At the least it would be good frozen.

Traditional Panna Cotta - Recipe from Giada de Laurentis


Ingredients
1 cup (240 ml) whole milk
1 tablespoon (one packet) (15 ml) (7 gm) (¼ oz) unflavored powdered gelatin
3 cups (720 ml) whipping cream (30+% butterfat)
1/3 cup (80 ml) honey
1 tablespoon (15 ml) (15 gm) (½ oz) granulated sugar
pinch of salt

Directions:
1. Pour the milk into a bowl or pot and sprinkle gelatin evenly and thinly over the milk (make sure the bowl/pot is cold by placing the bowl/pot in the refrigerator for a few minutes before you start making the Panna Cotta). Let stand for 5 minutes to soften the gelatin.
2. Pour the milk into the saucepan/pot and place over medium heat on the stove. Heat this mixture until it is hot, but not boiling, about five minutes. (I whisk it a few times at this stage).
3. Next, add the cream, honey, sugar, and pinch of salt. Making sure the mixture doesn't boil, continue to heat and stir occasionally until the sugar and honey have dissolved 5-7 minutes.
4. Remove from heat, allow it to sit for a few minutes to cool slightly. Then pour into the glass or ramekin.
5. Refrigerate at least 6 hours or overnight. Add garnishes and serve.
The second recipe from this month was a cookie that reminds me of a Lacey - lots of butter, not many 'solid' ingredients. They were super quick and easy!

Nestle Florentine Cookies

Ingredients:
2/3 cup (160 ml) (150 gm) (5.3 oz) unsalted butter
2 cups (480 ml) (160 gm) (5 2/3 oz) quick oats
1 cup (240 ml) (230 gm) (8 oz) granulated sugar
2/3 cup (160 ml) (95 gm) (3⅓ oz) plain (all purpose) flour
1/4 cup (60 ml) dark corn syrup
1/4 cup (60 ml) whole milk
1 tsp (5 ml) vanilla extract
pinch of salt
1½ cups (360 ml) (250 gm) (9 oz) dark or milk chocolate

Directions:
- Preheat oven to moderately hot 375°F (190°C) (gas mark 5). Prepare your baking sheet with silpat or parchment paper.
- Melt butter in a medium saucepan, then remove from the heat.
- To the melted butter add oats, sugar, flour, corn syrup, milk, vanilla, and salt. Mix well. Drop a tablespoon full, three inches (75 mm) apart, onto your prepared baking sheet. Flatten slightly with the back of your tablespoon, or use a spatula.
- Bake in preheated oven for 6-8 minutes, until cookies are golden brown. Cool completely on the baking sheets.
I skipped the extra chocolate part [- While the cookies are cooling melt your chocolate until smooth either in the microwave (1 1/2 minutes), or stovetop (in a double boiler, or a bowl that fits atop a saucepan filled with a bit of water, being sure the water doesn't touch the bottom of the bowl).]
- Peel the cookies from the silpat or parchment and place face down on a wire rack set over a sheet of wax/parchment paper (to keep counters clean).
I skipped the extra chocolate part [- Spread a tablespoon of chocolate on the bottom/flat side of your cookie, sandwiching another (flat end) cookie atop the chocolate.]

Tuesday, December 28, 2010

December Daring Bakers: Christmas Stollen

ok, sorry, I'm a day late here. I am visiting family and enjoying being done with my master's! Maybe I'm not sorry at all. Ok, nope, not sorry.

The 2010 December Daring Bakers’ challenge was hosted by Penny of Sweet Sadie’s Baking. She chose to challenge Daring Bakers’ to make Stollen. She adapted a friend’s family recipe and combined it with information from friends, techniques from Peter Reinhart’s book.........and Martha Stewart’s demonstration.

I had never heard of this before, but plenty of other daring bakers were excited about it. Apparently, it's traditionally made in the shape of a baby jesus in swaddling clothes. Anyone else a little grossed out by that one? K, just checking! I am in the middle of a card game, so just the pictures for now:


Enjoy!

Saturday, November 27, 2010

Daring Baker's Challenge November: Crostata

The 2010 November Daring Bakers’ challenge was hosted by Simona of briciole. She chose to challenge Daring Bakers’ to make pasta frolla for a crostata. She used her own experience as a source, as well as information from Pellegrino Artusi’s Science in the Kitchen and the Art of Eating Well.

When I saw this month's challenge, I was excited. A crostata is an Italian tart. I like tarts. I do tarts a lot. Well, when I can. And a new kind of tart sounded fun. It also sounded not-too-difficult which is great as I am desperately trying to finish everything I need for my degree by the deadline next Friday!

One of the directions of the challenge was to get creative with the tart filling. I love chocolate tarts, but that seemed just too easy. I automatically thought of the amazing black forest cake that someone made for my birthday and immediately decided that cherries would be the best way to liven up the chocolate tart.

So, tart cherries and chocolate were picked. But then what? Pastry cream or ganache? I got a little bit realistic here and realized a simple ganache would be much quicker. To make the chocolate flavor more intense, I called in my favorite secret ingredient: coffee. It would work great without the coffee, I'm sure, it just makes the chocolate more intense. Just a little in the cream really made a difference. I think it turned out great and my 3 taste-testers seem to agree.


It's not perfect, though, and the one glitch was completely avoidable. The crust recipe said to bake it for 20 minutes (with weights), then 5 without. Well, after that 25 minutes it looked a little soft and not very browned. And I left it in for about 10 more. Next time I'll take it out at 25; it tastes great, but it is just much too hard. I guess I should have realized that the different kind of crust is *similar* to what I usually make, but the person who wrote the recipe knew what she was doing.


The recipe for the crust is first, followed by my recipe for the filling. One thing to note is that I made this in a 10-inch springform pan and had a tiny bit of ganache left over - little enough that I could have added it on (instead of saving it to eat plain!) In a 9-inch tart pan, or in a pie pan, you may have more than you need.

Pasta Frolla (Crostata dough) recipe, straight from Simone:

Ingredients:

  • 1/2 c. minus 1 tablespoon [105 ml, 100 g, 3 ½ oz] superfine sugar or a scant 3/4 cup [180ml, 90g, 3 oz] of powdered sugar
  • 1 and 3/4 cup [420 ml, 235 g, 8 1/4 oz.] unbleached all-purpose flour
  • a pinch of salt
  • 1 stick [8 tablespoons / 4 oz. / 115 g] cold unsalted butter, cut into small pieces
  • grated zest of half a lemon
  • 1 large egg and 1 large egg yolk, lightly beaten in a small bowl
Making pasta frolla by hand:
  1. Whisk together sugar, flour and salt in a bowl.
  2. Rub or cut the butter into the flour until the mixture has the consistency of coarse crumbs. You can do this in the bowl or on your work surface, using your fingertips or an implement of choice.
  3. Make a well in the center of the mounded flour and butter mixture and pour the beaten eggs into it (reserve about a teaspoon of the egg mixture for glazing purposes later on – place in the refrigerator, covered, until ready to use).
  4. Add the lemon zest to your flour/butter/egg mixture.
  5. Use a fork to incorporate the liquid into the solid ingredients, and then use your fingertips.
  6. Knead lightly just until the dough comes together into a ball.
  7. Shape the dough into a flat disk and wrap in plastic wrap. Place the dough in the refrigerator and chill for at least two hours. You can refrigerate the dough overnight.
  8. [Added by Beki, based on Simone's directions] To blind-bake the shell (bake it empty), preheat oven to 350.
  9. Roll out 1/8th-1/4th inch thick on a piece of plastic wrap. Carefully move to the pan, plastic wrap side up, press into edges, and remove plastic wrap.
  10. Poke with a fork in several places and place a piece of aluminum foil or parchment paper over the bottom of the crust. If you have dry beans or pie weights, put them on top (I didn't use any, it was fine. Just poke it with a fork a lot so it doesn't bubble up.)
  11. Bake at 350 for 20 minutes. Remove weights and foil/parchment. Bake 5 more minutes and remove. Let cool completely.


Making pasta frolla with a food processor:

  1. Put sugar, flour, salt, and lemon zest in the food processor and pulse a few times to mix.
  2. Add butter and pulse a few times, until the mixture has the consistency of coarse meal.
  3. Empty food processor's bowl onto your work surface
  4. See step 3 above and continue as explained in the following steps (minus the lemon zest, which you have already added).
Cherry Chocolate filling

Ingredients:
1 can tart cherries in water
1/4 cup granulated sugar
8 oz chopped chocolate (I used good-quality chocolate chips that are 63% cacao)
1 cup heavy cream
2 tsps ground coffee (if you don't want to strain it (see step 4) you can use instant, but it may not be as good)

1. Drain cherries in a colander (I recommend over a dish, the juices are very tasty!)
2. Put chocolate into a small mixing bowl. Line a mesh sieve with 4 layers of cheesecloth and place over bowl of chocolate.
3. Heat heavy cream in a small saucepan over medium, stirring occasionally, until it boils.
4. When cream boils, add ground coffee. Cook, stirring constantly, 2 minutes. Pour through sieve into chocolate to remove all the grounds.
5. Stir chocolate and cream until chocolate melts and is completely incorporated.
6. Toss cherries with the sugar (in the colander works fine.) Spread cherries out in cooled tart shell.
7. Spread ganache over sugared cherries, encouraging it down between them. Allow to set at room temperature or refrigerate for 20-30 minutes and remove from fridge. You can store it at room temperature. If you refrigerate it, let it come to room temperature for (preferably) 2 hours before serving.

Wednesday, October 27, 2010

Daring Baker's Challenge - Pumpkin donuts!

The October 2010 Daring Bakers challenge was hosted by Lori of Butter Me Up. Lori chose to challenge DBers to make doughnuts. She used several sources for her recipes including Alton Brown, Nancy Silverton, Kate Neumann and Epicurious.

We had a choice of donut kinds: pumpkin, bamboloni (which is what they call them in Tunisia, I guess it's from Italy), or raised. Apparently the raised ones bake pretty well, so I was gonna do them if I had time. Then I realized that I don't have time.

I did force myself to take a break, though, to make one kind. And pumpkin it was! I thought it sounded delicious. I prefer cake donuts for the most part, and of course these were. I was surprised at how easy they were to make. The prep didn't take too long, but frying them up definitely did. I was happy to have a reason to use the candy thermometer that my mom sent me :) Mine didn't hang around long enough to get glazed, but there is glaze in the recipe below.

And now for the beautiful pictures. Of the whole process for once. Rolled out dough, half-cut out, in the oil. Draining on paper towels. Broken open on a pile of whole ones to see the gorgeous inside and out. And then stacked up on a plate before everyone came by and gobbled them down. So lovely and wonderful. Taken on my friend's good camera, because mine is quite crappy and I still haven't replaced it. My friend who, for once, decided to delete a bunch of his pictures.... and accidentally got rid of mine at the same time. Heart broken. You have no idea.

There is one minor redeeming fact. A girl here is taking a picture of every thing she eats for a year. And happened to get one of the pumpkin donut holes. Here it is. The sole lonely surviving picture.


Pumpkin Doughnuts:

Preparation time:
Hands on pre-chill prep time - 15 minutes
Chilling time - 3 hours
After-chilling prep time - 15 minutes
Cooking time - 30+ minutes (Depends on the size of your pan)

Yield: About 24 doughnuts & 24 doughnut holes

Ingredients
All Purpose Flour 3.5 cup / 840 ml / 490 gm / 17 ¼ oz
Baking Powder 4 teaspoon / 20 ml / 24 gm / .85 oz
Table Salt 1 teaspoon / 5 ml / 6 gm / .2 oz
Cinnamon, ground 1 teaspoon / 5 ml / 6 gm / .2 oz
Ginger, ground ½ teaspoon / 2.5 ml / 3 gm / .1 oz
Baking Soda ½ teaspoon / 2.5 ml / 3 gm / .1 oz
Nutmeg, ground ¼ teaspoon / 1.25 ml / 1.5 gm / .05 oz
Cloves, ground 1/8 teaspoon / .6 ml / ¾ gm / .025 oz
White Granulated Sugar 1 cup / 240 ml / 225 gm / 8 oz
Butter, Unsalted 3 Tablespoon / 45 ml / 42 gm / 1.5 oz
Egg, Large 1
Egg Yolk, Large 2
Pure Vanilla Extract 1 teaspoon / 5 ml
Buttermilk ½ cup + 1 Tablespoon / 135 ml /
Pumpkin 1 cup / 240 ml / 285 gm / 10 oz (Canned pure pumpkin or fresh cooked and pureed pumpkin – DON’T use pumpkin pie mix!)
Canola Oil DEPENDS on size of vessel you are frying in – you want THREE (3) inches of oil (can substitute any flavorless oil used for frying)

Powdered Sugar Glaze:

Powdered (Icing) Sugar 2 cup / 480 ml / 250 gm / 9 oz
Whipping Cream (About 32% butter fat) 4 Tablespoon + more if needed / 60 ml

Directions:

  1. Whisk together the first 8 ingredients in medium bowl to blend. Using electric mixer, beat sugar and butter in large bowl until blended (the mixture will be grainy and not smooth). Beat in egg, then yolks and vanilla. Gradually beat in buttermilk; beat in pumpkin. Using rubber spatula, fold in dry ingredients in 4 additions, blending gently after each addition. Cover with plastic; chill 3 hours.
  2. Sprinkle 2 rimmed baking sheets lightly with flour. Press out 1/3 of dough on floured surface to 1/2- to 2/3-inch (12 mm to 15 mm) thickness. Using 2 1/2-inch (65 mm) -diameter round cutter, cut out dough rounds. Arrange on sheets. Repeat with remaining dough in 2 more batches. Gather dough scraps. Press out dough and cut out more dough rounds until all dough is used.
  3. Using 1-inch (25 mm) diameter round cutter, cut out center of each dough round to make doughnuts and doughnut holes.
  4. Line 2 baking sheets with several layers of paper towels. Pour oil into large deep skillet to depth of 1 1/2 inches (40 mm). Attach deep-fry thermometer and heat oil to 365°F to 370°F (185°C to 188°C). Fry doughnut holes in 2 batches until golden brown, turning occasionally, about 2 minutes. Using slotted spoon, transfer to paper towels to drain. Fry doughnuts, 3 or 4 at a time, until golden brown, adjusting heat to maintain temperature, about 1 minute per side. Using slotted spoon, transfer doughnuts to paper towels to drain. Cool completely.


Glaze Directions:

  1. Whisk powdered sugar and 4 tablespoons whipping cream to blend. Whisk in additional cream, 1 teaspoon at a time, to form medium thick glaze.
  2. Can be made up to 3 hours ahead.
  3. Add doughnut holes to bowl of spiced sugar and toss to coat.
  4. Spread doughnuts on 1 side with powdered sugar glaze.
  5. Arrange doughnuts, glazed side up, on racks. Let stand until glaze sets, at least 30 minutes.

Tuesday, September 28, 2010

Daring Bakers September: Decorated Sugar Cookies


The September 2010 Daring Bakers’ challenge was hosted by Mandy of “What the Fruitcake?!” Mandy challenged everyone to make Decorated Sugar Cookies based on recipes from Peggy Porschen and The Joy of Baking.

While most people will think of sugar cookies as no kind of challenge, my sisters will laugh and tell you what disasters I've done with them in the past. I don't know why they were so difficult! The worst attempt is when I was going for purple and green (forget why - maybe spring?) and ended up with this grayish purple and green substance the consistency of toothpaste. Yuck. Luckily, this recipe was quite straight-forward and a few self-proclaimed sugar cookie haters enjoyed it.

The cookies were to be decorated with royal icing in ways that remind you of fall. I had never made it before, but the recipe is really simple. I mixed it up, went to get the food coloring, and -- the food coloring, where did it go??? I still don't know. So it became an EXTRA challenge: decorate cookies creatively all in white. I enlisted a few friends. Working at the table in the dining room, I found out that many people wanted to help! After I finish my finals, I think it would be a fun finals-break activity (yes, that's 10 weeks away.) You can find the full directions here.

Below is my favorite that I decorated, but there are plenty more! I thought I had taken pictures of every single one, but they're not all here!!!!!! :( I'm heart broken. I've been doodling this star on the sides of my class notes since high school. Fall = more classes = more notes = more stars.

This one is cookie monster. Someone said "we should do one that's cookie monster" T, from Vietnam, says, "Ok, I'll do it!" So I ask him, "T, do you know what cookie monster looks like?" And his response was something like "oh, it's a thing?" so he got someone with a laptop in the room to look it up for him. This was the result. I added the cookie crumbs on his face.

This is a running dog (tilt your head right). Courtesy of B, in picture below.

K, from Korea, made this one. I like it!

Made by K who ended up decorating more than anyone else! It's the name of where we live.

The portrait of B (on the cookie, B is on the left), made by R (holding the cookie.)

K's family, labeled and all.

And S's city. Even boys got in on the fun :)

Friday, August 27, 2010

Daring Bakers' August Challenge - Ice Cream Petit Fours

The August 2010 Daring Bakers’ challenge was hosted by Elissa of 17 and Baking. For the first time, The Daring Bakers partnered with Sugar High Fridays for a co-event and Elissa was the gracious hostess of both. Using the theme of beurre noisette, or browned butter, Elissa chose to challenge Daring Bakers to make a pound cake to be used in either a Baked Alaska or Ice Cream Petit Fours. The sources for Elissa’s challenge were Gourmet magazine and David Lebovitz’s “The Perfect Scoop”.

(Written while cake is baking:) First, I would like to rave about beurre noisette. Browned butter. Whatever you want to call it. I wasn't sure how this would work, and was a little cautious making it. But ohhhhh my. Noisette means hazelnut in French, and it's called that because the butter turns brown and gets a delicious nutty flavor. Like a kind of unbelievable one. And oh-so-awesome. Just the batter for the cake is wonderful, I can't wait to see how it is cooked! And with the ice cream I picked... excited!

Which ice cream, then? The amazing delicious lemon ginger one that I used last month! It was so tasty, but I only got one spoonful of it and I didn't find the time to make it again. I was so excited when I realized I could do it for this month's challenge. I *do* have the recipe for you this time, unlike last month when I totally lied and never posted it. (Sorry.) I decided to try to be a little healthier and used half and half instead of heavy cream. I'll let you know if that turns out to be an ok thing.
Ok, it has all been made (and eaten!) now. The icecream was still really good, but I think that if you decrease the fat like that you *really* need to make it in an icecream maker. It was more icey than creamy. Which made it hard to bite with the cake. The cake itself was really good, as expected. I will definitely make it again! I decided for the ganache to use a cooking light recipe that I have made before to go on a (peanut butter chocolate) cake, which was delicious. Unfortunately, it was a little thick, so while it's still pretty, it's not quite as pretty as I wanted. I'll quit talking now and let you see the prettiness:


The Ginger Lemon Ice Cream recipe is one I tinkered with, while the others are straight from their original sources. Enjoy!

Ginger Lemon Ice Cream

Yields about 1 quart

2/3 cup thinly sliced fresh ginger
2 cups heavy cream (or half & half, if you like)
1 1/2 cups whole milk
3/4 cup granulated sugar
Pinch of salt
Zest of 2 Lemons
5 large egg yolks

INSTRUCTIONS
Cut the ginger into thin slices. In a saucepan, place the ginger slices and add just enough water to cover. Bring the water to boil and blanch the ginger for two minutes. Drain. Save the ginger and discard the liquid. (This is important! Ginger has the lemon-like ability to curdle milk if not blanched.)

In a separate bowl, combine the finely grated lemon zest, sugar and milk. If you have a clean processor, throw the sugar and lemon zest into it. Mix with milk thoroughly until the sugar dissolves.

Place the reserved ginger back into the saucepan. Add the milk mixture, half a cup of cream and salt. Warm the mixture. Once warm, remove from the heat. Cover and steep for at least an hour or up to a whole day. I did overnight.

In a separate bowl, whisk the egg yolks.

Rewarm the ginger mixture. Remove the ginger slices with a slotted spoon. Dispose of the ginger. Slowly pour the warmed mixture in the egg yolks and continue to whisk.

Once combined, return the egg-ginger mixture to the saucepan. Over medium heat, stir the mixture constantly with a wooden spoon until it thickens and coats the spoon. Strain the mixture into a bowl and combine with the remaining cream.

Immediately chill the mixture in the freezer. Once thoroughly cooled, freeze it in your ice cream maker, according to the manufacturer’s instructions.

Get the other recipes by clicking below.

Wednesday, July 28, 2010

Daring Bakers' July Challenge - Swiss Swirl Ice Cream Cake

Yikes, I went through all the trouble of making this, and then forgot to post it on time! NOOO! Well, I'm only a day late, I'll have to hope that will do.

The July 2010 Daring Bakers’ challenge was hosted by Sunita of Sunita’s world – life and food. Sunita challenged everyone to make an ice-cream filled Swiss roll that’s then used to make a bombe with hot fudge. Her recipe is based on an ice cream cake recipe from Taste of Home.

My freezer was having issues getting cold enough, so my cake was pretty soft. I decided to keep the chocolate cake with whipped cream inside, but added just a touch of cilantro to the cream. For my two kinds of ice cream, I went with ginger-lemon and coconut (I'll post the recipes soon for you.) The Ginger-Lemon is now officially my favorite and was AMAZING. The coconut was coconut. So, good, but not anything to drool about. I may pretend I have time to make the ginger-lemon one again this weekend. So tasty.

First, a picture of the separate parts, to get you started:

And then, the beautiful cake:


I served it outside, so while I had hoped to get a pretty pick of the layers, it was hot out and started melting really quickly (in addition to the freezer problem) so by the time I had cut a few pieces, it was no longer pretty. At all. Oh, plus it was 11pm, so the lighting was bad. See, I tried to take a pic outside before we got smart and moved it to the hallway:

Tuesday, May 18, 2010

S--er, Tuesday Splurge: Ginger Syrup and Candied Ginger

These go together because one is the result of the other. Unless you set out to make them both intentionally, which is even better! This 'recipe' takes a decent bit of time, but not a lot of attention. I think it's a cool use for left-over ginger, though you could also peel it, wrap it up and keep it in the freezer (thanks, Karen!)

I can't remember where I got the idea, so I apologize to whichever foodblogger put this into my head :) It's less of a recipe and more of guidelines. I'm actually not quite sure what I'm going to do with it. I may try to throw the ginger in the processor and sprinkle it over gingerbread the next time I make it. The ginger syrup has only been used in a rhubarb compote I made today. (Which I ate with plain yogurt and granola - YUMM!) I'm gonna try to make ginger ale with club soda. I think it would be good with any fruit, drink, icecream, or yogurt. I used the photo from this person because it looks a decent bit like mine. Will take a photo when I remember, but I wanted to get this up.


Candied Ginger and Ginger Syrup
Serves: Depends on what you use it for! Time: An hour or so

Ginger
1 1/2 cups sugar
1/2 cup water

1. Peel your ginger and then slice very thinly. This will make it take less time for the pieces to give their juice to the syrup and suck up sugar themselves.

2. Put about sugar and water into a small sauce pan with the sliced ginger. Turn on to low. Stir gently until sugar dissolves and let it simmer for at least 30 minutes. Add more sugar and water if your ginger is not covered. You will want to add more water if the bubbles while it boils look really big. That's a sign that it's a lot of sugar and will be solid when you pour it out, not syrup.

3. When you're tired of waiting for them to boil, take them out and put them on a wire rack to drain and dry.

4. After it cools for a bit, pour the syrup into a container to keep in the fridge.

Tuesday, May 4, 2010

World's Healthiest Brownie!

Ok, I can't say for sure that they are. But they are by far the healthiest brownie I've had the pleasure to devour. Yet so moist and fudgy Let me show you a picture, to get your mouth watering.

These are another delightful product of Cara's kitchen. I made them last night and then fed bites to basically everyone who walked by. Everyone thought they were good. Many people did comment that they are not as sweet as standard brownies, and that's just fine in my book. I ruined one guy's world after telling them how wonderfully healthy they are after he had his bite. One of my friends has been experimenting with gluten-free recipes and was happy to learn that this one is, too.

In some ways, I wasn't sure if these should be considered dessert or main course. Yep, you read that right. So, why then? The main ingredient is black beans. Yep, plain ol' beans. With avocado as another key ingredient. No, I didn't lose my mind, it really is that brownie picture. And they really are good. Cara mentioned that they are better if you let them sit overnight, but I could never let them ALL sit. Actually, I was glad because I think I prefer them the first day. This way I know, though, and that is useful.

Below is the amazing recipe. I really like that it only uses one 'bowl' - the food processor (or blender.) She used egg replacer, I used real eggs. Sometime I'd like to try them with flax. She used agave nectar, I used honey. Both work, but maybe this is part of the reason I preferred them on day 1! I upped the servings to 16 (she had 12) just because I am picky and like my brownies to all be nice squares. Feel free to make 12. Or 9. Nine would be nice squares, too...

Black Bean Avocado Brownie
Servings: 16 Time: 15ish to prep, 30 to cook

1 (15.5 ounce) can black beans, rinsed and drained
3 eggs
1/4 cup honey
1/2 of a ripe avocado (I measured, mine was 6 Tbs)
6 Tablespoons cocoa powder
pinch of salt
1 teaspoons vanilla extract
6 Tablespoons white sugar
2 teaspoons instant espresso

- Preheat oven to 350º F. Line an 8x8" pan with parchment paper.

- Combine black beans, eggs, honey and avocado in food processor. Blend for a few minutes, until completely smooth. Add remaining ingredients and continue blending until fully combined, stopping once or twice to scrape down the sides of the bowl. Batter will be thick.

- Spread into parchment-lined baking dish. Bake for 30-33 minutes, or until a toothpick inserted in the brownies comes out clean.

- Yay, so easy!

Nutrition info (for 1/16th of recipe): Calories - 150 Fat - 2.0g Carbs - 27.7g Protein - 7.4g